-
Shop
- Advanced Technologies
- AI Career Advantage Collection
- AI Skills for Creators & Freelancers
- AI Client Management
- AI Ethics
- AI Mindset
- AI Tools & Prompts
- AI Writing & Content Creation
- Audio, Voice & Music
- Design & Visual Creation
- Email, Messaging & Communication
- Freelancing & Business
- Marketing, Ads & Conversion
- Productivity, Workflow & Automation
- SEO & Search Optimization
- Social Media Content & Growth
- Strategy, Planning & Analytics
- Video Creation & Editing
- AI Skills Mastery 2026 Collection
- Bathroom
- Best-Sellers
- Car Accessories
- Confidence
- Dating & Social Skills
- Digital Resources
- AI & Technology
- AI Skills
- Beauty
- Car Buying & Ownership
- Cozy Feast Collection
- Financial Education
- Hobbies
- Home Styling & Organization
- Kitchen & Recipes
- Mindset
- Online Business
- Parenting & Child Development
- Personal Style & Fashion
- Pet Lifestyle & Wellness
- Smart Life with AI
- Travel Planning
- Wellness
- Yoga & Fitness
- Education & Learning
- Fall/Winter 2025–26 Fashion Collection
- Family & Parenting
- Fashion
- Furniture
- Gadgets
- Health & Beauty
- Health & Wellness
- Home & Garden
- Home Electronics
- Jewelry
- Kids & Babies
- Kitchen
- Lighting
- Online Business for Beginners
- Patio, Lawn & Garden
- Personal Growth
- Pet Care
- Pet Supplies
- Pets
- Smart Amazon Shopping
- Smart Home Living Guides
- Sport & Outdoors
- Stress Relief & Relaxation
- Travel
- Travel & Adventure
- Wealth
- Popular
- Best deals
Zero-Budget Home Styling: Make Over Your Space With What You Own
Decorate Like a Pro Using Only What You Already Own: A Zero-Budget Home Makeover Checklist
A pulled-together home rarely requires new purchases—it requires better editing, smarter placement, and a clear process. When a space feels “off,” the fix is often as simple as clearing surfaces, repeating a few finishes, and giving everyday items a more intentional job. Below is a room-by-room method for shopping your home, plus a quick placement guide and a 30-minute styling sprint you can repeat anytime you want your home to feel refreshed. For more guidance, see 5 Ways to Get a Designer Look for Your Home on a Budget.
If you like having a step-by-step sheet on hand, the Decorate Like a Pro Using Only What You Already Own | Printable Home Styling Checklist makes it easy to move quickly without second-guessing. For further reading, see 29 affordable decorating ideas that are easy to copy | House & Garden.
Start With a Fast Reset: Clear Surfaces and Define the Goal
Before you “decorate,” reset. Styling on top of clutter never looks finished because the eye can’t find a focal point.
- Do a 10-minute reset per room: remove anything that doesn’t belong, then return only what supports the room’s purpose (rest, work, gathering, etc.).
- Pick one anchor feeling per space—calm, cozy, bright, grounded—and let it decide what stays visible and what gets stored.
- Create a temporary staging zone (a basket or box) for items being tested in new spots so you don’t build new piles.
- Work in daylight if possible. Natural light reveals undertones in wood, paint, and fabrics more accurately than overhead lighting.
For a quick refresher on foundational design principles, sources like The Spruce and Architectural Digest are helpful reference points—then you can apply the ideas using what you already have.
Shop Your Home: Build a Styling Inventory From What You Already Own
This step is the secret to a “collected” look: gather first, then edit. When you can see your options in one place, duplicates and mismatched pieces become obvious.
- Collect likely styling pieces from every room: trays, books, baskets, candles, small bowls, vases, framed art, textiles, and plants (real or faux).
- Sort by function: containers (baskets/bowls), height (candlesticks/vases), soft layers (throws/pillows), and story items (photos, travel pieces).
- Group by finish and color family: warm metals vs. cool metals, light wood vs. dark wood, black accents, whites/creams, and natural textures.
- Set aside duplicates and “almost” items (damaged, faded, or too small). Fewer, better-looking pieces displayed will read more intentional.
Think of this as creating a mini “home store” on your dining table for 15 minutes. You’ll move faster (and with less mess) once you start placing items back out.
Use Pro Styling Rules That Don’t Cost Anything
When a room looks professionally finished, it’s usually because a few simple rules are working together—not because everything is expensive.
- Balance: distribute visual weight (large vs. small, dark vs. light) so one side of a room or shelf doesn’t feel heavy.
- Height variation: style in thirds—low, medium, and tall elements together to avoid flat, lined-up arrangements.
- Odd-number groupings: clusters of 3 or 5 often look more natural than pairs, especially on coffee tables and shelves.
- Negative space: leave breathing room on shelves and surfaces; empty space is a design tool, not a failure.
- Repeat materials: echo one element (black frames, brass accents, woven texture, or greenery) in 2–3 places to create cohesion.
Room-by-Room Moves for a Zero-Budget Makeover
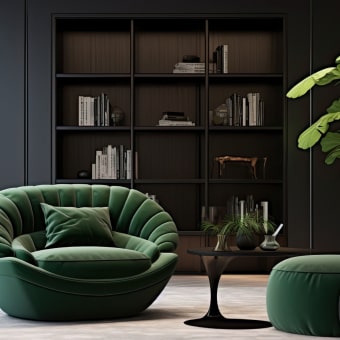
Living Room
Bedroom
Kitchen
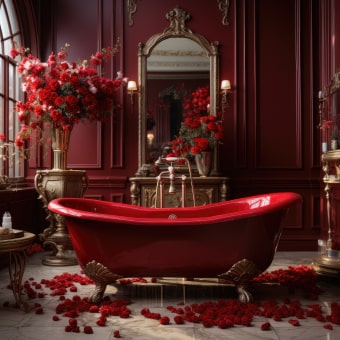
Bathroom
Entry
Quick Placement Guide: What to Put Where (Without Buying Anything)
| Item You Already Own | Best Spot | What It Fixes | Simple Pro Move |
|---|---|---|---|
| Tray or shallow basket | Coffee table / entry console / nightstand | Visual clutter | Group 3–5 small items together and leave the rest of the surface empty |
| Stack of books or magazines | Side table / shelf / console | Flat, lifeless surfaces | Add a small object on top (candle, bowl) to create height and layering |
| Throw blanket | Sofa / bed / reading chair | Room feels cold or unfinished | Fold neatly in thirds and drape over one arm for an intentional line |
| Cutting board / serving board | Kitchen counter / backsplash | Bare counter without warmth | Lean it vertically behind a bowl or canister for height |
| Bowl or small dish | Entry / bedside / bathroom | Loose items scattered | Use it as a landing pad for keys, jewelry, hair ties |
| Lamp (from another room) | Living room / bedroom | Harsh overhead lighting | Swap lamps so each main room has at least one warm light source |
Print-and-Go Checklist: A 30-Minute Styling Sprint
For a calm, “reset the mood” finishing touch after you’ve edited the room, the Essential Oils Relaxation Checklist – Simple Daily Ritual Guide pairs nicely with an evening tidy-up routine.
Common Mistakes That Make a Room Look Messy (and the Free Fixes)
FAQ
How can a room look expensive without buying anything?
Edit hard—clear surfaces and leave negative space—then repeat 2–3 finishes or colors (like black accents, warm wood, or brass) across the room. Use lamps you already own for warmer, layered lighting, and group small items in a tray or basket so everything looks intentional.
What should be styled first for the biggest impact?
Start with the highest-visibility zones: the entry drop zone, coffee table, sofa wall, and the bed/nightstands. Finish one focal point per room before moving on so each space looks complete instead of “in progress.”
How do items get moved around without creating chaos?
Use a staging basket or box for the room you’re working on, and set a timer so decisions stay quick. If something doesn’t work, return it to storage immediately instead of creating a new pile elsewhere.
Recommended for you


Natural Ways to Reduce Stress and Anxiety Fast
Jul 1, 2026


Leave a comment