
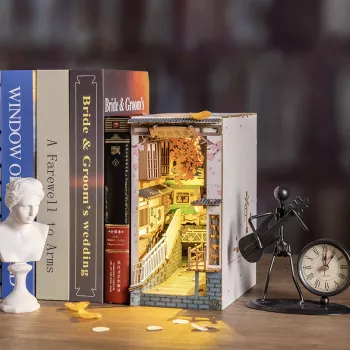
A book nook turns an ordinary shelf into a tiny scene that feels like it belongs inside a story. Our DIY Wooden Miniature House Book Nook Kit is made for slow, satisfying crafting: assembling layered wood pieces, adding small details, and ending with a finished display that sits neatly between novels, journals, and keepsakes. If you enjoy hands-on projects with a clear “before and after,” a book nook gives you that rewarding final moment every time you walk past your shelf.
When you place a book nook between your books, you’re not just filling a gap—you’re creating a focal point that changes the whole feel of the shelf.
If you’re building for the first time, plan on enjoying the process as much as the result. The most charming nooks aren’t rushed—they’re built in calm sessions where you can notice each layer coming together.
Our team’s favorite way to keep miniature builds enjoyable is to treat them like a short series: a few “chapters” instead of one marathon. A little structure upfront prevents the two classic mood-killers—lost pieces and glue surprises.
| Stage | Goal | Helpful habit |
|---|---|---|
| Sort & label | Know what you have before starting | Group pieces by shape/size in small dishes |
| Dry-fit | Confirm orientation and fit | Snap a quick reference photo before glue |
| Assemble structure | Build the stable frame first | Glue in small sections; clamp or hold as needed |
| Add details | Bring the scene to life | Do one “detail cluster” at a time to avoid clutter |
| Finish & display | Make it shelf-ready | Let adhesives cure fully before moving |
You can absolutely keep your setup simple, but a few small tools make miniature work smoother and cleaner. For general tool safety basics, OSHA’s guidance is a solid reference: OSHA – Hand and Power Tools.
| Item | Why it helps |
|---|---|
| Wood-safe craft glue | Stronger bonds and cleaner joins |
| Tweezers | Control for miniature parts |
| Clips/clamps | Keeps layers flat while curing |
| Fine sandpaper | Improves fit on tight joints |
| Cutting mat + precision knife | Cleaner adjustments with better safety |
| Small brush/paint (optional) | Personalize the scene and highlight details |
If you’re trimming or sanding small parts, eye protection is worth it. The CDC/NIOSH overview is a helpful reminder of why: CDC/NIOSH – Eye Safety.
Miniatures reward consistency. A few careful habits will give your finished book nook that “intentional” look—clean lines, crisp layers, and fewer visible glue marks.
One more practical tip: keep your “working” hand clean. If you notice tacky glue on fingertips, pause and wipe it off—tiny fingerprints can leave shine on wood and painted details.
For a simple, low-pressure companion item, our team likes the Essential Oils Relaxation Checklist – Simple Daily Ritual Guide. It’s an easy way to turn the build session into a little “reset” time.
If you’re building for yourself and want to keep momentum afterward, a lightweight planning prompt can help you schedule the next creative block—our Fuel Up & Fire Ahead: Your Entrepreneur Quote Action Checklist is a simple, action-focused option.
It can be beginner-friendly if you take it step by step: dry-fit before gluing, work in short stages, and use simple helpers like tweezers and clips. Patience matters more than experience for miniature builds.
Most builders use a wood-safe craft glue, tweezers, and clips or small clamps, plus fine sandpaper for occasional tight joints. Optional paint or markers can help you personalize details.
Work inside a tray or shallow box lid, sort parts into small bowls, and only pull out the next few pieces you need. If something drops, sweep the area gently with a soft brush instead of using your hands.






Leave a comment